 xxxsjan Docs
algolia在vitepress中的使用
以vitepress为例说明
注册登录
首先官网https://www.algolia.com/ 注册登录,用github账户快速注册即可
进入设置
登录后,点击头像,setting(设置)
General下找到Applications,点击
创建应用
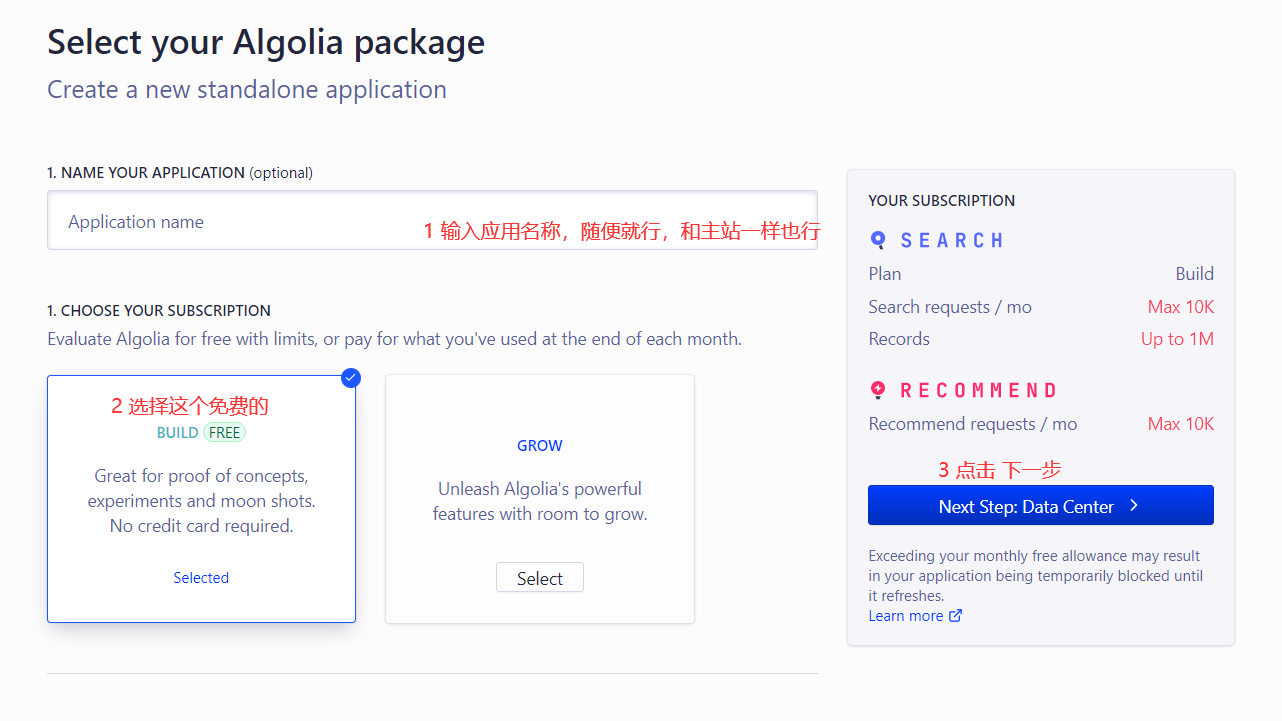
进入后,点击Create Application
第一步
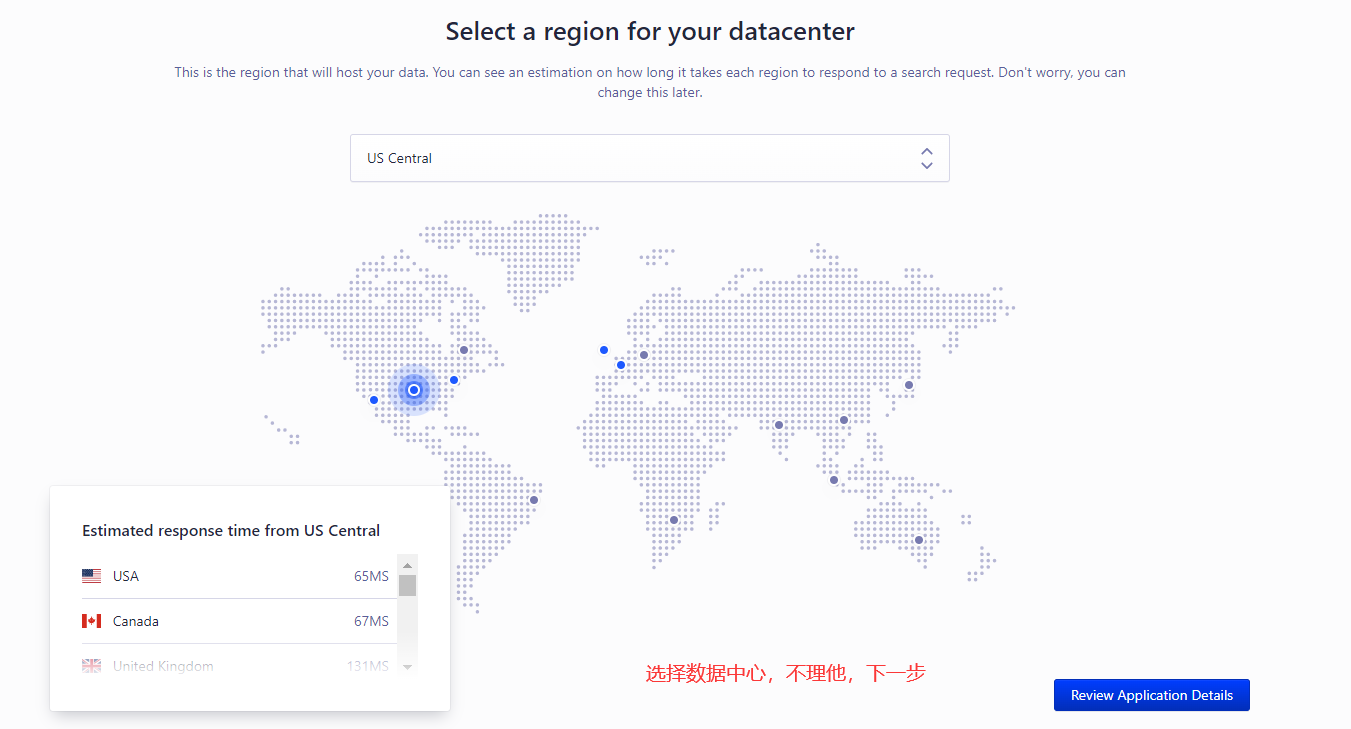
第二步
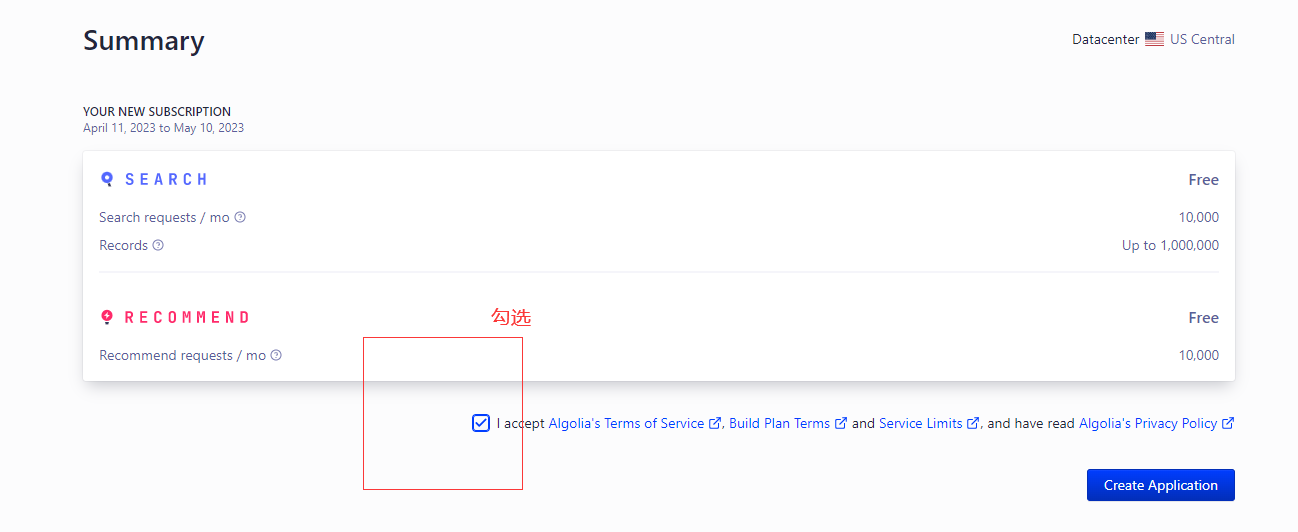
第三步
勾选
创建成功
get start不用管
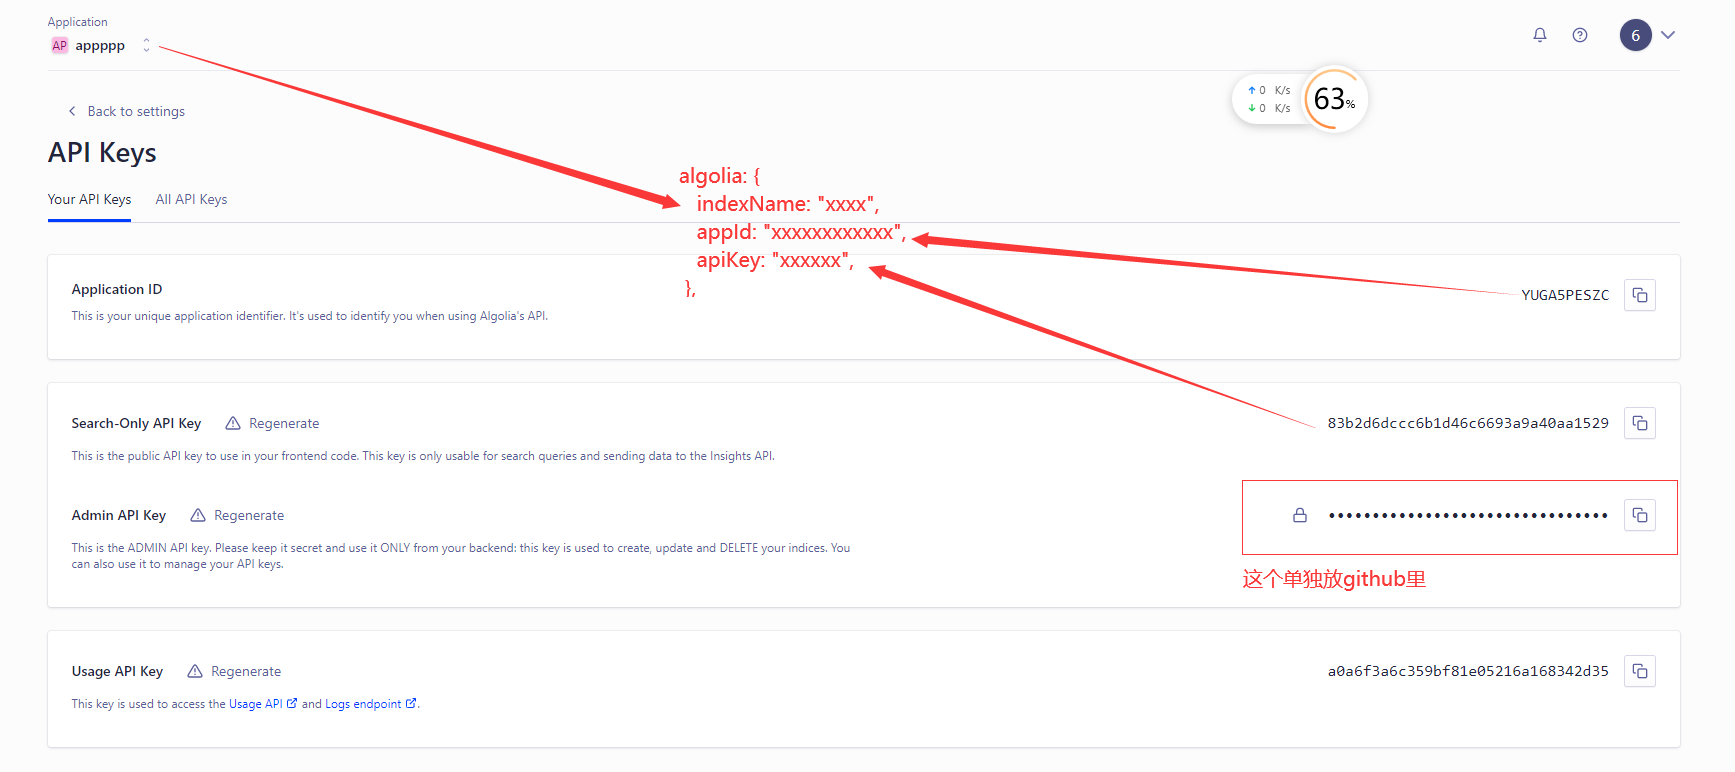
获取各种key
来到这个页面
点击 apikey进去

然后,看到几个关键信息
- indexName 也就是前面创建的应用名称
- Application ID 就是appid
- Search-Only API Key 只有搜索权限
- Write API Key 有写入权限
- Admin API Key 最高管理员权限,后面要复制粘贴到github上管理
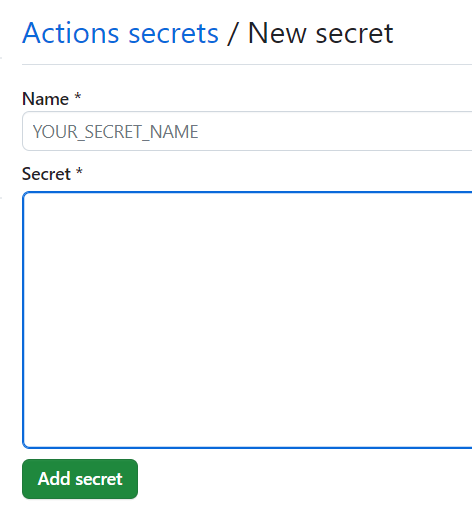
新建仓库密匙
主要是用来给github 的action用
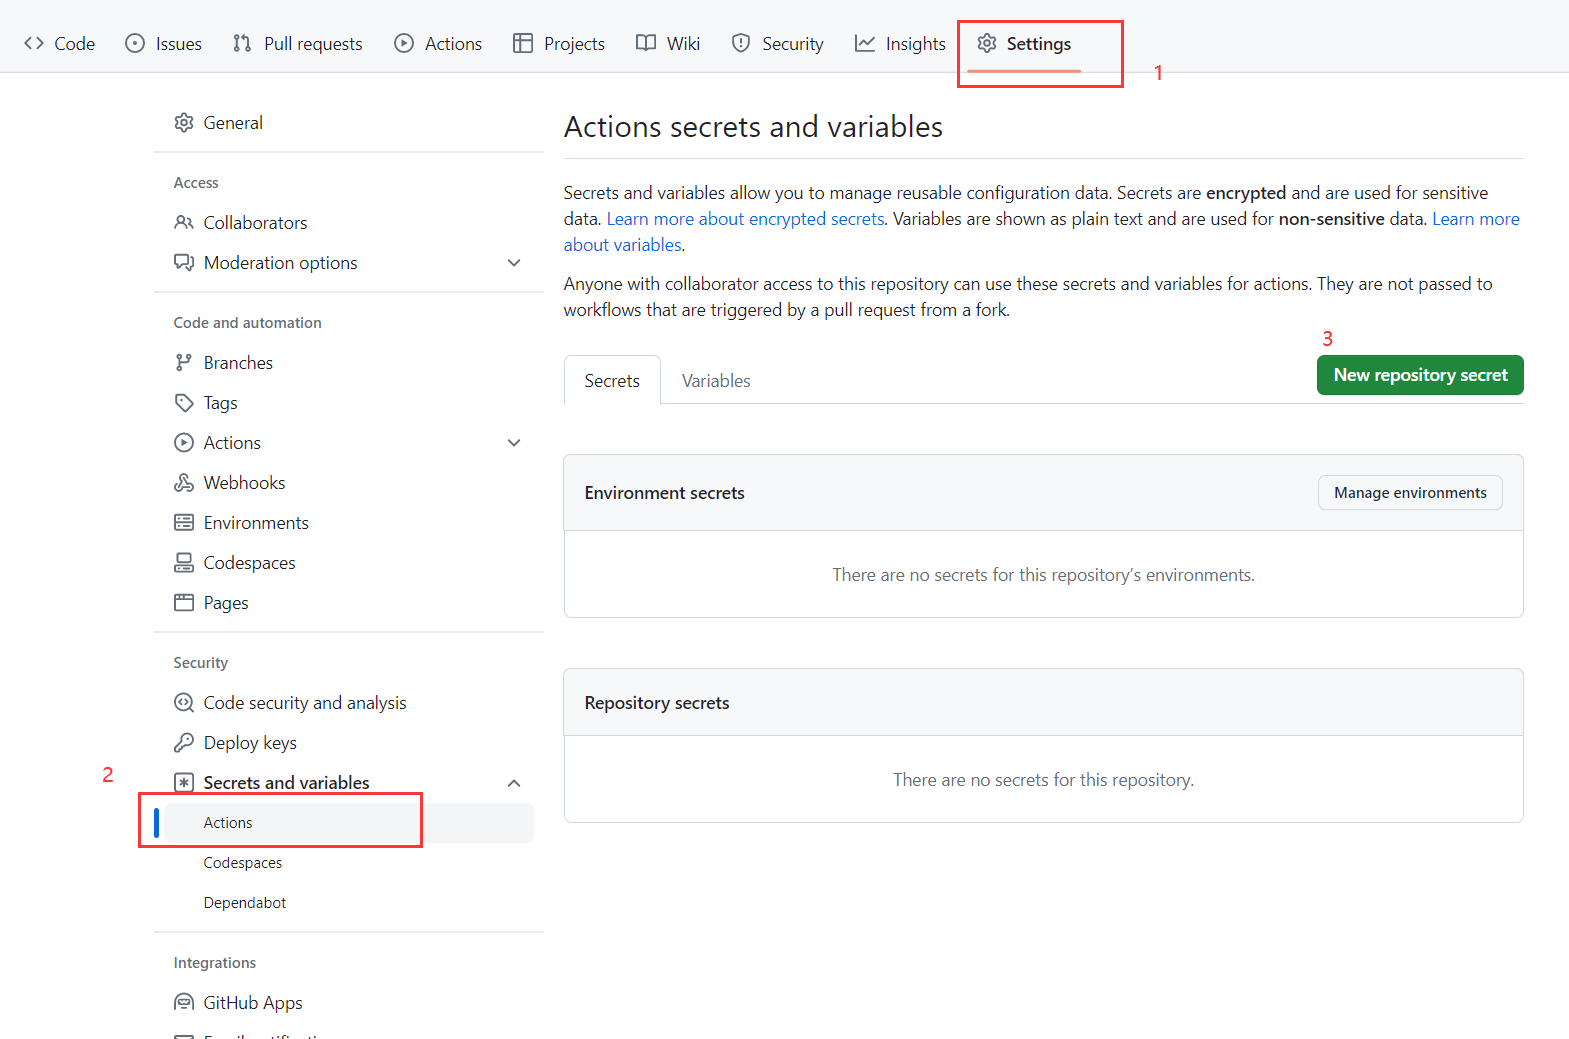
新增两个密匙
Name: API_KEY Secret: Search-Only API Key
Name: APPLICATION_ID Secret: Application ID

vitepress 配置 algolia
docs/.vitepress/config themeConfig
{
  // ....
  themeConfig:{
       algolia: {
        "appId": "xxxxxxxxxxxxx",
        "apiKey": "xxxxxxxxxxxx",
        "indexName": "xxxxxxxxxxxxxxxxx",
        "placeholder": "请输入关键词",
        "buttonText": "搜索"
      }
  }
}
配置完成,页面就会有搜索的ui了
配置crawlerConfig.json
项目根目录新建crawlerConfig.json
{
  "index_name": "xxxxxxxxxxxxxxxxxxxxxxxxxxxxxxxxxxx",
  "start_urls": ["https://xxxxxx.xxxxxxxxxxxxxxx.com/"],
  "rateLimit": 8,
  "maxDepth": 10,
  "selectors": {
    "lvl0": {
      "selector": "",
      "defaultValue": "Documentation"
    },
    "lvl1": ".content h1",
    "lvl2": ".content h2",
    "lvl3": ".content h3",
    "lvl4": ".content h4",
    "lvl5": ".content h5",
    "content": ".content p, .content li",
    "lang": {
      "selector": "/html/@lang",
      "type": "xpath",
      "global": true
    }
  },
  "selectors_exclude": [
    "aside",
    ".page-footer",
    ".next-and-prev-link",
    ".table-of-contents"
  ],
  "custom_settings": {
    "attributesForFaceting": ["lang", "tags"]
  },
  "js_render": true
}- index_name:表示要将爬取到的数据保存到哪个索引中,这里需要根据具体的需求来设置。
- start_urls:表示需要爬取的网站的入口 URL,可以有多个入口 URL。
- rateLimit:表示请求频率限制,即在多长时间内最多能够发送多少个请求,避免过快地访问网站,影响网站的正常运行。
- maxDepth:表示最大爬取深度,即从入口 URL 开始,最多可以爬取多少层内容。
- selectors:定义了网站页面中各级标题和内容的 CSS 选择器。其中,lvl0 表示一级标题,其 selector 为空字符串,因为一级标题通常是固定的,不需要选择器来匹配;lvl1 表示二级标题,其 selector 是 ".content h1",表示匹配 class 为 content 的元素下的所有 h1 标签;lvl2 ~ lvl5 分别表示三到六级标题,以此类推;content 表示页面内容,其 selector 是 ".content p, .content li",表示匹配 class 为 content 的元素下的所有段落和列表项;lang 是语言选择器,其 selector 是 "/html/@lang",表示使用 XPath 表达式来选择 HTML 根节点的 lang 属性。
- selectors_exclude:列出了需要排除的元素,如侧边栏、页脚等,用于提取页面正文内容时过滤掉这些无用信息。
- custom_settings:用于设置需要进行聚合(faceting)的属性,这里将语言和标签作为聚合属性。
- js_render:一个布尔值,表示是否启用 JavaScript 渲染。如果启用,则需要使用 Headless Chrome 等工具模拟浏览器访问网站,以便获取动态渲染的内容。
配置github action
根目录创建.github\workflows\algolia.yml
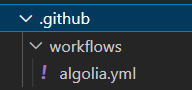
填入代码
name: algolia
on:
  push:
    branches:
      - main
jobs:
  algolia:
    runs-on: ubuntu-latest
    steps:
      - uses: actions/checkout@v3
      - name: Get the content of algolia.json as config
        id: algolia_config
        run: echo "config=$(cat crawlerConfig.json | jq -r tostring)" >> $GITHUB_OUTPUT
      - name: Push indices to Algolia
        uses: signcl/docsearch-scraper-action@master
        env:
          APPLICATION_ID: ${{ secrets.APPLICATION_ID }}
          API_KEY: ${{ secrets.API_KEY }}
          CONFIG: ${{ steps.algolia_config.outputs.config }}
解释:
https://github.com/signcl/docsearch-scraper-action
cat crawlerConfig.json 命令会将 crawlerConfig.json 文件的内容输出到标准输出流中;jq -r tostring 命令是利用 jq 工具将 JSON 对象转换为字符串,其中 -r 表示输出原始数据(raw output),即不包含双引号,而 tostring 则将其转换为字符串类型。
最终,通过将 config 变量写入到 GITHUB_OUTPUT 环境变量中,就可以将其传递给下一个 GitHub Action 步骤使用。
提交代码
git push提交你刚修改的代码到仓库即可
action或跑逻辑,爬取你网站的数据
爬取数据结果查看
进去algolia dashboard
search index 你的应用名即可查看
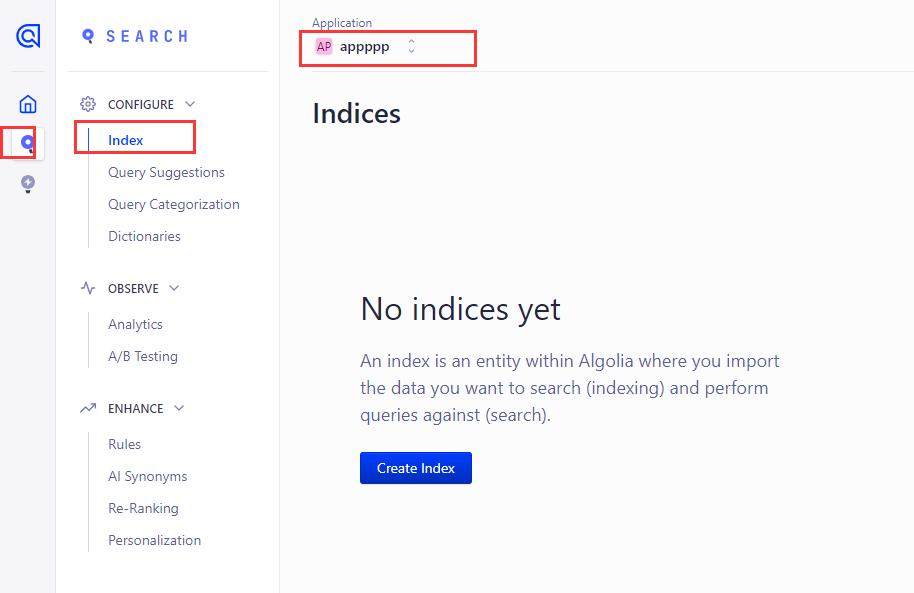
看到提示,创建index,点击 create index
然后随便输入index 的名字

看到没有记录,这是因为我并没有配置爬虫,哈哈,只是创建来做演示教程的
不出意外的话,你的可以看到有数据,类似这样

好的,教程结束,希望可以帮到你