 xxxsjan Docs
keywords
husky lint-staged eslint prettier
流程
git commit husky -- pre commit --lintstaged success
一、代码检查:eslint
npm i eslint -D npx eslint --init 初始化eslint配置,按照步骤,最后会生成.eslintrc文件 帖个图 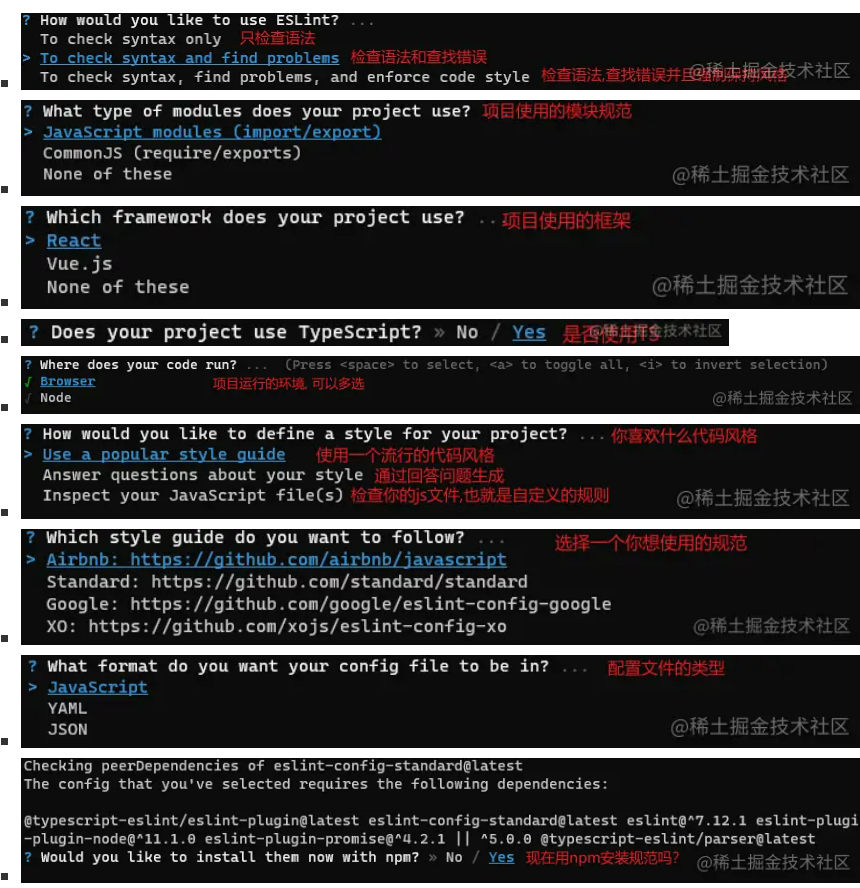 最后一步yes的话 会安装eslint-plugin-vue@latest, @typescript-eslint/eslint-plugin@latest, @typescript-eslint/parser@latest
跑完后,会生成一个.eslintrc
注意:vue3加这两句,不然eslint报 Parsing error: ‘>‘ expected.
 把.eslintrc.json里的parserOptions配置改成
// parser: '@typescript-eslint/parser',
// parserOptions: {
//   ecmaVersion: 'latest',
//   sourceType: 'module'
// },

"parser": "vue-eslint-parser",
  "parserOptions":{
  "parser":"@typescript-eslint/parser",
},配置参考https://zhuanlan.zhihu.com/p/98617401 格式化问题参考汇总格式化的各种问题 测试命令 "lint": "eslint --ext .vue,.js,.ts src/"
二、代码风格:prettier
npm i prettier -D 手动新建 .prettierrc,写点基础配置,如下
{
  "semi": true,
  "tabWidth": 2,
  "trailingComma": "none",
  "singleQuote": true,
  "arrowParens": "avoid"
}
解决 Prettier 和 ESLint 的冲突 安装:npm i eslint-config-prettier eslint-plugin-prettier -D
module.exports = {
  extends: [
    "eslint:recommended",
    "plugin:vue/vue3-essential",
+    'plugin:prettier/recommended'
  ],
}
三、样式处理:stylelint
https://juejin.cn/post/6878121082188988430
- stylelint-config-standard: 官网提供的 css 标准
- stylelint-config-recess-order: 属性排列顺序
- stylelint-prettier: 基于 prettier 代码风格的 stylelint 规则
- stylelint-config-prettier: 禁用所有与格式相关的 Stylelint 规则,解决 prettier 与 stylelint 规则冲突,确保将其放在 extends 队列最后,这样它将覆盖其他配置。
安装依赖 npm install -D stylelint stylelint-config-standard stylelint-config-rational-order stylelint-prettier stylelint-config-prettier
.stylelintrc.js
module.exports = {
  extends: ['stylelint-config-standard', 'stylelint-config-rational-order', 'stylelint-prettier/recommended'],
  rules: {
    // 'prettier/prettier': [true, { singleQuote: false }],
    // at-rule-no-unknown: 屏蔽一些scss等语法检查
    'at-rule-no-unknown': [true, { ignoreAtRules: ['mixin', 'extend', 'content'] }], // 禁止使用未知的 at 规则
    'rule-empty-line-before': [
      // 要求或禁止在规则声明之前有空行
      'always-multi-line',
      {
        except: ['first-nested'],
        ignore: ['after-comment'],
      },
    ],
    'at-rule-empty-line-before': [
      // 要求或禁止在 at 规则之前有空行
      'always',
      {
        except: ['blockless-after-same-name-blockless', 'first-nested'],
        ignore: ['after-comment'],
      },
    ],
    'comment-empty-line-before': [
      // 要求或禁止在注释之前有空行
      'always',
      {
        except: ['first-nested'],
        ignore: ['stylelint-commands'],
      },
    ],
    'block-no-empty': true, // 禁止出现空块
    'declaration-empty-line-before': 'never', // 要求或禁止在声明语句之前有空行。
    'declaration-block-no-duplicate-properties': true, // 在声明的块中中禁止出现重复的属性
    'declaration-block-no-redundant-longhand-properties': true, // 禁止使用可以缩写却不缩写的属性。
    'shorthand-property-no-redundant-values': true, // 禁止在简写属性中使用冗余值。
    'function-url-quotes': 'always', // 要求或禁止 url 使用引号。
    'color-hex-length': 'short', // 指定十六进制颜色是否使用缩写
    'color-named': 'never', // 要求 (可能的情况下) 或 禁止使用命名的颜色
    'comment-no-empty': true, // 禁止空注释
    'font-family-name-quotes': 'always-unless-keyword', // 指定字体名称是否需要使用引号引起来 | 期待每一个不是关键字的字体名都使用引号引起来
    'font-weight-notation': 'numeric', // 要求使用数字或命名的 (可能的情况下) font-weight 值
    'property-no-vendor-prefix': true, // 禁止属性使用浏览器引擎前缀
    'value-no-vendor-prefix': true, // 禁止给值添加浏览器引擎前缀
    'selector-no-vendor-prefix': true, // 禁止使用浏览器引擎前缀
    'no-descending-specificity': null, // 禁止低优先级的选择器出现在高优先级的选择器之后
  },
};
四、提交规范:husky **lint-staged **
husky----------操作 git 钩子的工具 lint-staged----本地暂存代码检查工具
安装husky lint-staged
安装:npm i lint-staged husky -D 设置脚本:npm set-script prepare "husky install" 启动脚本:npm run prepare
以上脚本操作会在package.json里加上一句脚本
{
  "script":{
    "prepare":"husky install"
  }
}
npm run prepare // 这个命令会生成.husky文件夹 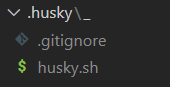
添加git钩子命令
npx husky add .husky/pre-commit "npx lint-staged" 这个命令会在项目根目录创建一个.husky的文件夹,里面会有钩子及对应的脚本 
#!/bin/sh
. "$(dirname "$0")/_/husky.sh"

echo "---eslint start---"
npm run lint
echo "---eslint end---"

echo "---ts lint start---"
npm run tsc
echo "---ts lint end---"

作者:前端阿林
链接:https://juejin.cn/post/7051828074362437663
或者自己手动在package.json里添加钩子命令
(但是这种好像会不生效,挺奇怪的,可能是版本问题,先不建议)
{
  "husky": {
    "hooks": {"pre-commit": "lint-staged"}
  }
}
lintstaged配置
创建.lintstagedrc.json配置 对本地暂存代码文件 的检查工具,可以自定义检查的文件类型,也就是后缀名
{
  "*.{js,jsx,ts,tsx,vue}": "cross-env NODE_ENV=production eslint --fix --quiet --cache",
  "*.{css,less}": "cross-env NODE_ENV=production stylelint --fix --quiet --cache",
  "*.json": "prettier --write"
}

// 或者

{
    "*.{js,jsx,ts,tsx}": ["prettier --write .", "eslint  --fix"],
    "*.md": ["prettier --write"]
}
或者package.json配置
{
  "lint-staged": {
    "*.{js,jsx,ts,tsx,vue}": "cross-env NODE_ENV=production eslint --fix --quiet --cache",
    "*.{css,less}": "cross-env NODE_ENV=production stylelint --fix --quiet --cache",
    "*.json": "prettier --write"
  },
}
commitlint --commit 信息校验工具
- Commitlint:用于校验填写的commit message是否符合设定的规范
npm i commitlint @commitlint/config-conventional -D @commitlint/config-conventional这个默认是_Angular_的提交规范 添加husky钩子 npx husky add .husky/commit-msg 'npx --no-install commitlint --edit "$1"' 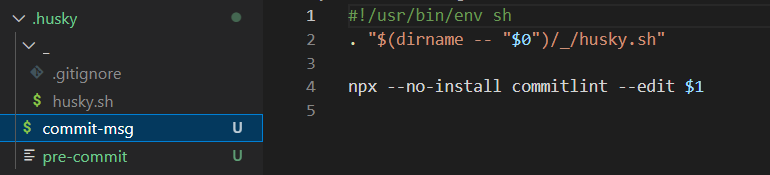 旧版本是commitlint -E HUSKY_GIT_PARAMS这种 新版本是commitlint --edit "$1" 或者手动在package.json添加(可能会不生效,不建议,可能版本原因)
{
  "husky": {
    "hooks": {
      "pre-commit": "lint-staged",
+      "commit-msg": "npx --no-install commitlint --edit \"$1\""
    }
  }
}
commitizen ---辅助 commit 信息
可以通过会话选择输入,规范提交信息 --也就是提示你改写什么,一步步完成log
- Commitizen:是一个命令行提示工具,它主要用于帮助我们更快地写出规范的commit message
npm i commitizen -g 全局安装 添加npm脚本 npm set-script commit "git-cz" 或者手动敲
{
 "scripts": {
    "commit": "git-cz"
  },
}
可选:使用cz-conventional-changelog规则
(也可以不安装,使用自己的规则) 安装:npm i cz-conventional-changelog -D 执行命令 前提是packsge.json里没有提前配置config-commitizen-path
npx commitizen init cz-conventional-changelog --save-dev --save-exact
# npm commitizen init cz-conventional-changelog --save-dev --save-exact
# yarn commitizen init cz-conventional-changelog --yarn --dev --exact
# pnpm commitizen init cz-conventional-changelog --pnpm --save-dev --save-exact
https://github.com/commitizen/cz-cli 上面的命令会在package里添加
表示commitizen规则按cz-conventional-changelog走
"config": {
    "commitizen": {
      "path": "./node_modules/cz-conventional-changelog"
    }
 }
可选:使用自己的规则
使用自己规则,就不用安装上面那个了(cz-conventional-changelog) 得借助commitlint-config-cz来自定义
安装:npm i -D commitlint-config-cz cz-customizable 把package.json里的commitizen配置改成使用cz-customizable
"config": {
    "commitizen": {
      "path": "node_modules/cz-customizable"
    }
 }
添加commitlint.config.js文件
module.exports = {
// 使用 .cz.config.js里的规则
extends: ['cz'],
rules: {
// 自定义
}
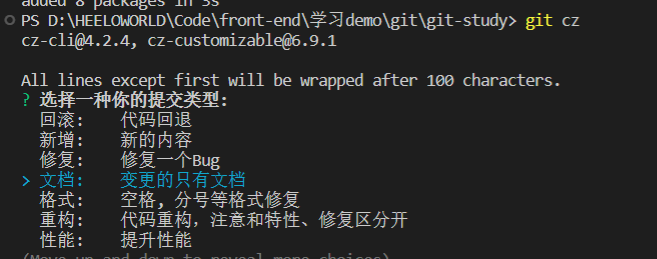
};新建 .cz-config.js
'use strict'
  module.exports = {
    types: [
      { value: '✨新增', name: '新增:    新的内容' },
      { value: '🐛修复', name: '修复:    修复一个Bug' },
      { value: '📝文档', name: '文档:    变更的只有文档' },
      { value: '💄格式', name: '格式:    空格, 分号等格式修复' },
      { value: '♻️重构', name: '重构:    代码重构,注意和特性、修复区分开' },
      { value: '⚡️性能', name: '性能:    提升性能' },
      { value: '✅测试', name: '测试:    添加一个测试' },
      { value: '🔧工具', name: '工具:    开发工具变动(构建、脚手架工具等)' },
      { value: '⏪回滚', name: '回滚:    代码回退' }
    ],
    scopes: [
      { name: 'leetcode' },
      { name: 'javascript' },
      { name: 'typescript' },
      { name: 'Vue' },
      { name: 'node' }
    ],
    // it needs to match the value for field type. Eg.: 'fix'
    /*  scopeOverrides: {
      fix: [
        {name: 'merge'},
        {name: 'style'},
        {name: 'e2eTest'},
        {name: 'unitTest'}
      ]
    },  */
    // override the messages, defaults are as follows
    messages: {
      type: '选择一种你的提交类型:',
      scope: '选择一个scope (可选):',
      // used if allowCustomScopes is true
      customScope: 'Denote the SCOPE of this change:',
      subject: '短说明:\n',
      body: '长说明,使用"|"换行(可选):\n',
      breaking: '非兼容性说明 (可选):\n',
      footer: '关联关闭的issue,例如:#31, #34(可选):\n',
      confirmCommit: '确定提交说明?(yes/no)'
    },
    allowCustomScopes: true,
    allowBreakingChanges: ['特性', '修复'],
    // limit subject length
    subjectLimit: 100
  }
最后提交变成这样了 提交要使用git cz